
USER GUIDES

Analog Fusion brings the warmth and magic of analog recording consoles to your DAW. It is NOT an 'effects' box. Analog Fusion is console modeling at its finest.
1. Using Analog Fusion on a Channel:
The "CHANNEL" knob is designed to enhance the sound of individual tracks by adding the subtleties of classic microphone preamps. Turn this knob clockwise to increase the amount of processing and use it on as many channels as you like. At first, you will notice a subtle change in tone, warmth, richness, and clarity. However, when used on multiple channels the difference will be... stunning.
2. Using Analog Fusion on an Aux or Master Fader:
The "CONSOLE" knob is designed to enhance the sound of Aux inputs and the Master Fader. This knob contains the subtleties of line amps and summing amps.
Sweet!!! Turn this knob clockwise to increase the amount of processing and use it on as many Aux channels as you like. Remember; a little bit will go a long way!
3: Love your mix.
ANALOG FUSION

REEL TO REAL
Reel to Real is a simple and easy to use plugin that accurately models the sound of analog tape... WITHOUT the noise.
1. Tape emulation can be subtle, so we suggest starting with it on your Master Fader. This will immediately add the tone and beauty of analog tape to your mix.
2. Adjust the BIAS control: Under-bias adds warmth and Over-bias will make the sound brighter.
3: Adjust the Head Stack knob, the TAPE knob, the tape SPEED knob and the TRANSFORMER switch to your taste.
4: Insert Real to Real on any Audio Channel, Aux or Bus where analog tone is desirable. The more you use it, the more noticeable it will be.
5: Love your mix!

PARALLEL VOCALS
1: Insert Parallel Vocals on an audio channel or aux.
2: The EMPHASIS knob controls the interactive compression and tonal balances within the Parallel Vocals plugin. Set the EMPHASIS knob to a setting that best matches the sound of the vocalist or group. For ensembles or sub-mixes, choose the GROUP setting.
3: The RESPONSE control sets the character and response of the Parallel Vocals plugin. The FAST setting will produce a smoother sound and the SLOW setting will produce a harder sound (with more attack). If you aren’t sure where to start, try the MEDIUM setting first.
4: The PARALLEL COMPRESSION fader controls the amount of parallel compression to be added to the dry signal. Adjust to your taste.
5: Freak out :)
For more information about Parallel Compression, please CLICK HERE.

PARALLEL DRUMS
1: Insert Parallel Drums on an audio channel, Drum Aux or a Drum Sub-mix.
2: Set the INSTRUMENT knob to the instrument you are mixing. This knob controls the interactive compression and tonal balances within the Parallel Compressor. When using on the insert of a Kick, select “Kick”, etc. When using on a sub-mix, aux or on an entire kit, select “All”.
3: The RESPONSE control sets the character and response of the parallel compression. The FAST setting will produce a smoother sound and the SLOW setting will produce a harder sound. If you aren’t sure where to start, try the MEDIUM setting first.
4: The PARALLEL COMPRESSION fader controls the amount of parallel compression to be added to the source (dry) signal. Adjust to your taste.
For more information about Parallel Compression, please CLICK HERE.

MIX BUS LITE
1: Set the STYLE knob for the kind of music you are mixing. This knob controls the Attack & Release times of the interactive compression and affects the tonal balance within the MixBussLite. If you aren’t sure where to start, try POP first.
2: Adjust the INPUT DRIVE so the ORANGE and YELLOW lights are glowing mostly solid. If the RED light blinks, it’s OK. This is not a dB meter, it's a "sweet spot" meter. The more you drive the input, the more you will hear the other knobs at work. So, crank it. :-)
3: Adjust the COLOR to your taste. In most settings, this control should be quite easy to hear. Each setting has its own unique sound, so if you want more color, use TWO plugins and adjust to your taste.
4: Love your mix.

DRUM BUS LITE
1: Set the STYLE knob for the kind of music you are mixing. This knob controls the Attack & Release times of the interactive compression and affects the tonal balance within the Drum Bus Lite. If you aren’t sure where to start, try POP first.
2: Adjust the INPUT DRIVE so the ORANGE and YELLOW lights are glowing mostly solid. If the RED light blinks, it’s GOOD! This is not a dB meter, it's a "sweet spot" meter. The more you drive the input, the more you will hear the other knobs at work. So, crank it. :-)
3: Adjust the COLOR to your taste. In most settings, this control should be quite easy to hear. Each setting has its own unique sound, so if you want more color, use TWO plugins and adjust to your taste.
4: Love your drums!

BASS BUS LITE
1: Set the STYLE knob for the kind of music you are mixing. This knob controls the Attack & Release times of the interactive compression and affects the tonal balance within the Bass Bus Lite. If you aren’t sure where to start, try POP first.
2: Adjust the INPUT DRIVE so the ORANGE and YELLOW lights are glowing mostly solid. If the RED light blinks, it’s GOOD! This is not a dB meter, it's a "sweet spot" meter. The more you drive the input, the more you will hear the other knobs at work. So, crank it. :-)
3: Adjust the COLOR to your taste. In most settings, this control should be quite easy to hear. Each setting has its own unique sound, so if you want more color, use TWO plugins and adjust to your taste.
4: Love your bass!

SYNTH BUS LITE
1: Set the INST knob for the keyboard instrument you are mixing. This knob controls the interactive compression and tonal balances within the Synth Bus Lite.
2: Adjust the INPUT DRIVE to add volume and compression. The effect will be most obvious when the ORANGE and YELLOW lights are glowing mostly solid. If the RED light blinks, it’s OK. It is not a dB meter, it's a "sweet spot" meter. The more you drive the input, the more you will hear the other knobs at work.
3: Adjust the COLOR to your taste. In most settings, this control will be quite noticeable. Each position will add more and more color to the sound. Choose ‘None’ for no color; select ‘Single’ for some color;
select ‘Double or ‘Triple’ for even more... or choose ‘Max’ for maximum effect.
4: Love your keyboard sound.
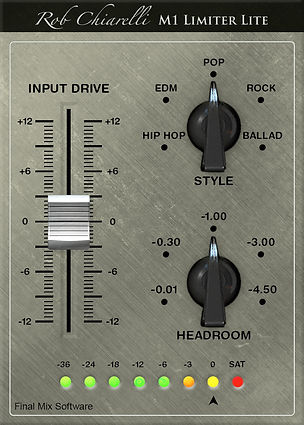
M1 LIMITER LITE
1: The M1LimiterLite should be called the OMG plugin. Put it LAST on your Master Fader.
2: Set the STYLE knob for the kind of music you are mixing. This knob controls the Attack & Release times of the interactive compressor and brick wall limiter. This control is closely related to the amount of high and low frequency information is contained in the program material. Initially, you may NOT hear any difference, but it’s there if you listen closely. If you aren’t sure where to start, try the POP setting first.
3: Adjust the INPUT DRIVE so the ORANGE and YELLOW lights are glowing mostly solid. If the RED light blinks, it’s OK. This is not a dB meter, it's a "sweet spot" meter. The more you drive the input, the more limiting you will get. Don’t hit it too hard. The M1LimiterLite should be transparent, so use your ears!
4: Adjust the HEADROOM control to the desired output format. For HOT digital mixes or CD’s, set to -0.01dB. If you are creating an MP3, set to -0.30dB. If you are sending to iTunes, set to -1.00dB. If you are sending your mix to a Mastering Engineer, set to -3.0dB. If you are sending for Broadcast TV, set to -4.5dB. CLICK HERE for more information.

MIX BUS EQ
1: Adjust the incredibly smooth Mix Bus EQ to your taste.
2: If the red SAT light blinks, it indicates light saturation. It’s OK. It’s a good thing.
3: Love your mix.

WESTLAKE EQ
1: Adjust the powerful Westlake EQ to your taste.
2: Smile.

MASTERING EQ
1: Select a frequency and adjust the smooth and beautifully transparent Mastering EQ to your taste.
2: The normal range of the gain control is +/- 3dB. If you want more boost or cut, move the switch to the x3 setting. This will increase the range of the boost or cut to +/-9dB.
3: Adjust the slope (bandwidth) to your taste.
4: The blue LED lights also function as IN/OUT switches for each band of equalization
5: Use the High-pass filter to tighten up the low end. Use the Low-pass filter to attenuate the high end.


1: Using the outer (silver) ring, select the desired frequency and adjust EQ-73 to your taste.
2: Use the blue knob to adjust the high pass filter.
3: Use the inner (grey) knob to adjust the boost/cut. The normal range of the gain control is +/- 10dB.
4: The EQ button functions as an IN/OUT (bypass) button.
5: The green LED indicates the presence of audio. The red LED indicates the saturation threshold has been reached.
EQ-73 MODERN & VINTAGE

EQ-540 VINTAGE III
1: The EQ-540 is a gorgeous, classic tube-style plugin that sounds like a beautiful vintage equalizer.
2: Select the desired LOW or HIGH frequency
3: Adjust the Low Gain and High Gain to your taste. Be careful! It's easy to get carried away with the EQ-540!
4: The normal range of the gain control is +/- 20dB
5: Adjust the BIAS control to your taste. Turning the BIAS control counter-clockwise will have the affect of 'brightening' the sound and turning clockwise will have the affect of 'warming' the sound.
6: Adjust the SATURATION control to introduce gentle tube-style saturation. Adjust to taste.
7: Smile :)
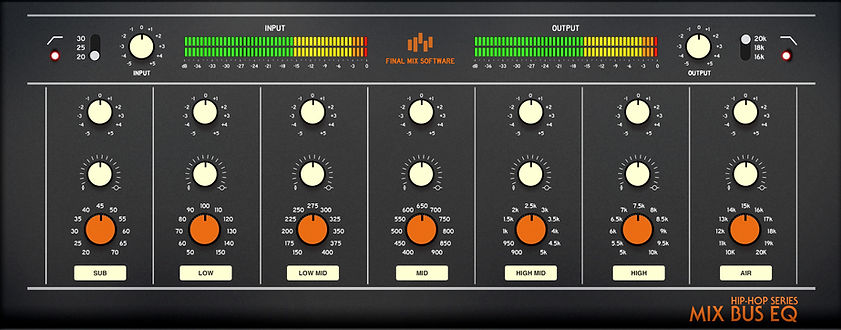
HIP-HOP SERIES MIX BUS EQUALIZER III
1: The Hip-Hop Series Mix Bus EQ is engineered with the Master Fader in mind.
2: Select the frequency that you would like to boost or cut.
3: Adjust the gain control for as much as +/- 5dB to taste.
4: Adjust the bandwidth to narrow or wide-band.
5: Adjust the High-pass filter and the Low-Pass filter to taste.
6: Love your mix.

HIP-HOP SERIES EQ III
1: The Hip-Hop Series EQ is designed to shape your sound with precision, while adding the character and edge that modern mixes demand.
2: Select the frequency that you would like to boost or cut.
3: Adjust the GAIN knob for as much as +/- 15dB.
4: Adjust the BANDWIDTH knob to narrow or wide-band.
5: Adjust the SAT knob and the DIRT knob for character and punch.
6: Love your vocals, drums, bass, instruments, Master Fader, and more!

HIP-HOP SERIES SATURATION III
1: The Hip-Hop Series Saturation plugin delivers controlled audio enhancement that makes every element pop
2: Adjust the SATURATION knob to drive the plugin engine.
3: Adjust the FILTER to control the range of the Saturation.
4: Adjust the BLEND control to get the perfect mix of dry signal and Saturation.
5: Fall in love with your new secret weapon.

HIP-HOP SERIES OVERDRIVE III
1: The Hip-Hop Series OVERDRIVE plugin is aggressive thermo-nuclear distortion.
2: Adjust the OVERDRIVE knob to drive the plugin engine.
3: Adjust the FILTER to control the range of the Overdrive.
4: Adjust the BLEND control to get the perfect mix of dry signal and Saturation.
5: Perfect for adding bite and grit to any track.

HIP-HOP SERIES SUB BASS EQ III
1: The Hip-Hop Series Sub EQ is designed to blow speakers.
2: Select the FREQUENCY that you would like to boost or cut.
3: Choose the point where you would like SATURATION to begin.
4: Crank the BOOST knob.
5: That's right, it says +30dB :-)
+30dB